Pages

January 28, 2014

Hearts & Ribbons

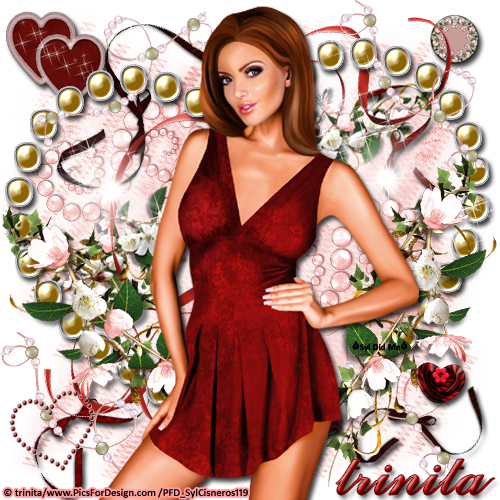
I made this Valentine tag using Trinita's PTU tube Mary.


The creation of this tutorial is my own any resemblance to any other tutorial is strictly a coincidence.
Do not copy this tutorial or claim it as your own. If you would like to share it, please share the link to blog ONLY.
This tutorial was written using Adobe Photoshop CS5 and is for those with a working knowledge of Photoshop. This tutorial can be adapted for anyone with a working knowledge of PSP.

Before we start, I would like to remind you to save frequently. This is in case your program closes on you as mine is known to do. J  I save as a .psd file. This keeps your elements in layers instead of merging everything the way a .png file does. I also do not say copy and paste your element onto your canvas. In Photoshop, it is possible to drag and drop. But if you are more comfortable copying and pasting, then by all means do what is easier for you. I use a white background while I’m making my tag but I delete it when I am finished.

Supplies needed:

I’m using the beautiful tube Mary from trinita. You can get it here.

I’m using a FTU scrap kit from Lady Hawwk Designs. You can get it here. Scroll down to the bottom of the page. Be sure to leave some love if you download it.

Mask: Insatiable Desires Mask 503. You can get it here. Scroll down to Masks13.

Font used is called 38. You can use any font you want though.

Open a canvas 500x500

Create your mask using paper 13. Place on your canvas to your liking.

E34 = Reduce 25.3%. Place in the upper left corner of your canvas. Add a drop shadow.

E3 = Reduce 44.7%. Rotate –26.7. Place in the center of your canvas. Add a drop shadow.

E6 = Reduce 38.6%. Rotate –25.5. Place between the hearts and flowers. Add a drop shadow.

Ribbon 7 = Duplicate. Take the first copy and reduce 26.9%. Rotate 88.2. Place in the lower right of your canvas to your liking. Add a drop shadow.
Take your second copy. Flip horizontally. Reduce 36.5%. Rotate 18.3. Place near the two hearts at the top left. Add a drop shadow.

Ribbon 6 = Duplicate. Take your first copy. Reduce 30.5%. Rotate 47.0. Place on the lower left side of your canvas or to your liking. Add a drop shadow.
Reduce your duplicate copy 26.3%. Place on the right side of the floral element or to your liking. Add a drop shadow.

E25 = Reduce 18.2%. Place in the upper right hand of your canvas or to your liking. Add a drop shadow.

Ribbon 3 = Reduce Width – 60.2%. Height - 76.6%. Rotate 29.6. Place in the center of your canvas or to your liking. Add a drop shadow.

E31 = Reduce 99.2%. Place on the left side of your canvas towards the top.

E6 = Reduce 38.3%. Rotate-24.9. Place in the middle of your canvas or to your liking. Add a drop shadow.

E7 = Reduce 68.1%. Rotate  -6.8. Place in the center of your canvas. Add a drop shadow.

E1 = Reduce Width – 32.3. Height – 32.2%. Rotate –42.0. Place in the lower left corner of your canvas. Duplicate twice. Take the 1st copy and place it on the lower right corner of your canvas or to your liking. Take the 2nd copy and place it in the upper right corner of your canvas. Duplicate and rotate –88.6. Place over the two hearts on the upper left side of your canvas. Add a drop shadow.

E8 = Reduce 11.6%. Rotate –13.2. Place on the lower left corner of your canvas ot ro your liking.

E31 = Place on the right side of your canvas making sure it’s slightly off the canvas and towards the top.

E4 = Reduce Width – 61.5%. Height – 63.6%. Rotate 21.9. Place over the frame on the right side. Add a drop shadow. Duplicate and flip horizontally. Rotate –20.5%. Place on the lower left of the frame.

E14 = Reduce 12.3%. Place towards the bottom right side of your canvas. Add a drop shadow.

Open your tube. Resize to your liking. Place in the center of your canvas. Add a drop shadow.

Type the name. The color settings are C30000.  Size 61 points. After you type in your name, go to your blending options.
Check Drop Shadow using the default settings.
Check Bevel and Emboss using the default settings.
Check Stroke size 1, color is 5E0B08. Place the name on the bottom right of your canvas.

Add your license and your watermark.

Delete the white background. Save as .png.


I hope this tutorial was easy to follow. Again, you do not have to follow this step by step. Add your own touch to it.

January 20, 2014

Smoky Valentine

This tag/tutorial was made for the beautiful tube Smoky Eyes from trinita. She's a new designer at Picsfordesign.


The creation of this tutorial is my own any resemblance to any other tutorial is strictly a coincidence.
Do not copy this tutorial or claim it as your own. If you would like to share it, please share the link to blog ONLY.
This tutorial was written using Adobe Photoshop CS5 and is for those with a working knowledge of Photoshop. This tutorial can be adapted for anyone with a working knowledge of PSP.

Before we start, I would like to remind you to save frequently. This is in case your program closes on you as mine is known to do. J  I save as a .psd file. This keeps your elements in layers instead of merging everything the way a .png file does. I also do not say copy and paste your element onto your canvas. In Photoshop, it is possible to drag and drop. But if you are more comfortable copying and pasting, then by all means do what is easier for you. I use a white background while I’m making my tag but I delete it when I am finished.

Supplies needed:
Amy Marie’s Show Me scrap kit. You can find where to buy it here.

I’m using the very awesome Smoky Eyes from trinita. You can get it here.

Mask: Mask 535 by Insatiable Dreams, you can find it here. Scroll down the page, it’s under Masks 13.

Font used is called 38. You can use any font you want though.

Open a canvas 500x500

Create your mask using paper 13. Place on your canvas to your liking.

Bow 5 = Reduce 36.6%. Place in the upper left corner of your mask. Add a drop shadow.

Net 1 = Rotate 94. Reduce 58.5%. Place in the lower right corner of your canvas.

Frame 1 = Reduce 76.9%. Place in the middle of your canvas. Add a drop shadow.

Ribbon 1 = Reduce 61.2%. Place on the left side of your frame. Add a drop shadow.

B3 = Rotate –10.6. Place on the left side of your frame. Add a drop shadow.
Duplicate. Flip Horizontally. Reduce 79.6%. Rotate –13.7. Place on the lower right of your frame.

B2 = Reduce 69.5%. Rotate –11.0. Place over B3. Add a drop shadow.
Duplicate. Flip Horizontally. Reduce 81.7%. Rotate –13.7. Place over B3 copy.

Lip = Reduce 28.2%. Rotate –25.6. Place inside your frame slightly to the right. Add a drop shadow.

Diamond Heart = Reduce 14.1%. Rotate –22.4. Place on the left of your frame towards the bottom or to your liking. Add a drop shadow.

Rosewfeather = Reduce 37.0%. Place on the right side of your canvas. Add a drop shadow.

Champagne Bottle = Reduce 51.2%. Place over the Rosewfeather or to your liking. Add a drop shadow.

Dragonfly1 = Reduce 23.7%. Rotate –20.2. Place on the top right corner of your canvas or to your liking. Add a drop shadow.

Open your tube. Reduce to your liking. Place in the middle of your canvas towards the bottom. Add a drop shadow.

RosenBeads = Reduce 14.6%. Place in the lower left corner of your canvas.

Glass = Reduce 31.8%. Place in the bottom right corner of your canvas. Add a drop shadow.

Laceglove2 = Reduce 45.3%. Place to the left of the glass. Add a drop shadow.
Duplicate. Reduce 91.0%. Place slightly lower than the first glove.

Cat = Reduce 37.8%. Place it on top of the gloves, as if it’s sitting on them. Add a drop shadow.

Lipstick = Reduse 20.6%. Place on the left side of your canvas to the right of the rose. Add a drop shadow.

Nailpolish = Reduce 22.8%. Place to the right of the lipstick or to your liking. Add a drop shadow.

GemF2 = Reduce 17.5%. Place inside your frame at the top. Add a drop shadow.

Type the name. The color settings are D60101.  Size 68 points. After you type in your name, go to your blending options.
Check Drop Shadow using the default settings.
Check Bevel and Emboss using the default settings.
Check Stroke size 2, color is 000000. Place the name on the top left of your canvas.

Add your license and your watermark.

Delete the white background. Save as .png.


I hope this tutorial was easy to follow. Again, you do not have to follow this step by step. Add your own touch to it.
January 16, 2014

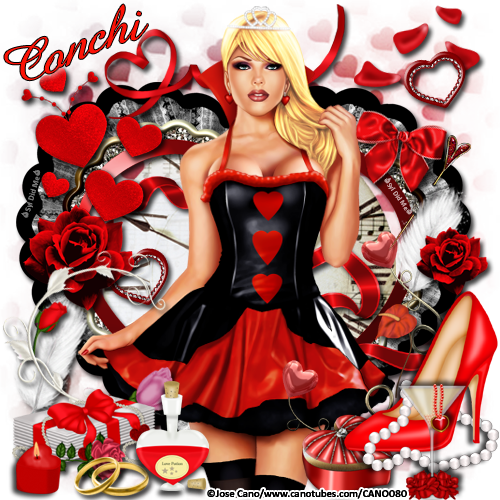
PTU Tutorial Bouquet of Love

This PTU tutorial was made using Bouquet of Love scrap kit from DN Scraps which can be found at Mystical Scraps Store. This is a great kit and has many beautiful elements to work with.


The creation of this tutorial is my own. Any resemblance to any other tutorial is strictly a coincidence.
Do not copy this tutorial or claim it as your own. If you would like to share it, please share the link to blog ONLY.
This tutorial was written using Adobe Photoshop CS5 and is for those with a working knowledge of Photoshop. This tutorial can be adapted for anyone with a working knowledge of PSP.

Before we start, I would like to remind you to save frequently. This is in case your program closes on you as mine is known to do. J  I save as a .psd file. This keeps your elements in layers instead of merging everything the way a .png file does. I also I do not say copy and paste your element onto your canvas. In Photoshop, it is possible to drag and drop. But if you are more comfortable copying and pasting, then by all means do what is easier for you. I also use a white background while I’m making my tag but I delete it when I am finished.

Supplies needed:
Bouquet of Love scrap kit from DN Scraps. You can find where to buy it here.

I’m using the tube Heart Queen from Jose Cano. You can get it here.

Mask: Vix Valentine 15 Mask, you can find it here. Scroll down the page, it’s titled 6th February 2008. Please follow her TOU for using her masks.

Font used is Amazone BT. You can use any font you want though.

Open a canvas 500x500

Create your mask using Bouquet of Paper 6.

Heart Frame = Reduce 58.5%. Center on your canvas towards the bottom. Add a drop shadow.

Clock face = Reduce 42.7%. Place behind the Heart frame.

Heart Ribbon = Reduce 30.4%. Place at the top of your frame. Add a drop shadow.

Petals = Reduce 16.2%. Rotate –6.2. Place at the right top of your canvas. Add a drop shadow.

Feather = Flip Horizontally. Reduce 17.2%. Rotate 22.2. Place on the left of your frame towards the bottom. Add a drop shadow.

Big Bow = Reduce 11.5%. Rotate 17.2. Place at the top right of your frame. Add a drop shadow.

Ribbon = Reduce 39.9%. Place in the middle of your frame slightly to the right. Add a drop shadow.

Open your tube. Reduce to your liking and place in the center of the canvas. Add a drop shadow.

Diamond Heart = Reduce 8.0%. Rotate –17.1. Place near the petals at the top right corner of your canvas. Add a drop shadow. Duplicate and place on the left of your canvas inside the frame.

Pretty Rose – Reduce 14.2%. Place on the left of your frame above the feather. Add a drop shadow.

Feather = Reduce 15.9%. Rotate 22.9. Place on the right side of your frame towards the middle or to your liking. Add a drop shadow.

Pretty Rose = Reduce 9.6%. Place slightly over the feather on the right side of your frame. Add a drop shadow.

Hearts = Reduce 32.0%. Place to the left of your frame at the top or to your liking. Add a drop shadow.

Doodles = Reduce 30.3%. Place towards the bottom right of your frame. Add a drop shadow.

Rose Bulb = Reduce 23.5%. Rotate 16.8. Place on the left of your frame towards the bottom. Add a drop shadow.

Love Letters = Reduce 18.5%. Place on the left bottom side of your frame. Add a drop shadow.

Rings = Reduce 9.4%. Place at the bottom left of your canvas. Add a drop shadow.

Heart Flower = Reduce 13.1%. Place on the right side of your frame. Add a drop shadow.

Love Potion = Reduce 14.7%. Place near the rings. Add a drop shadow.

Diamond Box = Reduce 11.6%. Place on the lower part of your canvas slightly off to the right. Add a drop shadow.

Shoes and Pearls = Reduce 22.1%. Place on the lower right side of your canvas. Add a drop shadow.

Love Glass = Reduce 17.7%. Place in front of the Shoe and Pearls to your liking. Open your Blending Options. Check Drop Shadow. Change the distance to 2.

Heart Candle = Reduce 7.5%. Place on the lower left of your canvas. Add a drop shadow.

Pin = Reduce 15.4%. Place to your liking on the right side of your frame.

Type the name. The color settings are FC1307.  Size 55 points. After you type in your name, go to your blending options.
Check Drop Shadow:
Blend Mode – Normal
Angle – 120
Distance – 0
Spread – 28
Size - 10
Color - FDFDFD
Check Stroke size 1, color is 000000. Place the name on the top left of your canvas.

Add your license and your watermark.

Delete the white background. Save as .png.

I hope this tutorial was easy to follow. Again, you do not have to follow this step by step. Add your own touch to it.

January 13, 2014

Feeling Frosty

PTU CT Show Off Tags for Jackie's Jewels using the cute kit Feeling Frosty. You can find where to purchase it on her blog or at Pimpin PSPers Warehouse.


January 11, 2014

Camo Cakes Tutorial

PTU CT Tag/Tutorial for Scrappin' Krazy Designs.
I used her poser Becky which went very well with the kit.


The creation of this tutorial is my own any resemblance to any other tutorial is strictly a coincidence.
Do not copy this tutorial or claim it as your own. If you would like to share it, please share the link to blog ONLY.
This tutorial was written using Adobe Photoshop CS5 and is for those with a working knowledge of Photoshop. This tutorial can be adapted for anyone with a working knowledge of PSP.

Before we start, I would like to remind you to save frequently. This is in case your program closes on you as mine is known to do. J  I save as a .psd file. This keeps your elements in layers instead of merging everything the way a .png file does. I also I do not say copy and paste your element onto your canvas. In Photoshop, it is possible to drag and drop. But if you are more comfortable copying and pasting, then by all means do what is easier for you. I also use a white background while I’m making my tag but I delete it when I am finished.

Supplies needed:
Scrappin’ Krazy Designs, Camo Cakes scrap kit. You can find where to buy it here.

I’m using the very awesome poser Becky from Kaci McVay. You can get it here.

Mask: Mask 31 by WeeScotLass you can find it here. Scroll down the page, all the links to her masks will be on the right.

Font used is Times New Roman. You can use any font you want though.

Open a canvas 500x500

E85= Reduce 71.1%. Reduce opacity to 47%. Place in the middle of your canvas.

Create your mask using paper 13. Place on your canvas to your liking.

E64= Maximize to 57.3%. Place in the center of your canvas.

E37 = Flip horizontally. Reduce 70.5%. Place on the top right of your canvas. Add a drop shadow.

E61 = Flip horizontally. Reduce 57.8%. Place on the right side of your frame.

E73 = Reduce 50.5%. Place on the left side of your canvas. Open your Blending Options. Add a drop shadow using the default settings.
Click on Outer Glow using the default settings.

E66 = Reduce 72.9%. Place near the bottom of your canvas.

E55 = Reduce 19.2%. Rotate 59.6. Place near the bottom left of your canvas or to your liking. Add a drop shadow.

E95 = Reduce 72.8%. Rotate 20.8. Place in the center of your canvas over your frame. Duplicate 2 times. Take the last copy and place towards the top of your frame. Duplicate.

E87 = Reduce 37.6%. Rotate –17.1. Place on the left side of your canvas slightly over the flower. Add a drop shadow. Duplicate. Rotate 23.9. Place toward the top right of your canvas.
E79= Reduce 36.7%. Place on the right side of your frame to your liking. Add a drop shadow.

E33= Duplicate 5 times.
1st copy: Reduce 46.6%. Place by the razor.
2nd copy: Reduce35.3%. Place on the left side near the flowers or to your liking.
3rd copy: Reduce 23.3%. Place on the left side of your canvas.
4th copy: Reduce 21.1%. Place at the top of your canvas on the left side.
5th copy: Reduce 26.9%. Place at the top of your canvas on the left side.
6th copy: Reduce 29.3%. Place inside the frame in the middle or to your liking.

E13= Place in the middle of your canvas. Add a drop shadow.

E48= Flip Horizontally. Reduce 40.3%. Rotate -23.6. Place on the right side of your canvas to your liking. Add an outer glow.

E61= Reduce 44.1%. Place on the left side of your frame.

E58= Duplicate.
1st copy: Flip vertically. Reduce 22.4%. Rotate 16.3. Place at the bottom of your frame. Add a drop shadow.
2nd copy: Flip horizontally. Reduce 22.0%. Rotate –16.0. Place above the 1st copy to your liking. Add a drop shadow.

E12= Reduce 24.8%. Place on the lower right side of your frame, to your liking. Add a drop shadow.

E32= Reduce 27.4%. Place near the bullet hole at the top left side of your canvas. Add a drop shadow.

E70= Reduce 38.4%. Place as if it’s hanging from the handcuffs. Add a drop shadow and Outer Glow.

E12= Reduce 17.1%. Place at the top of your frame to your liking. Add a drop shadow.

Take your poser and reduce 85.3%. Place in the center of your canvas. Add a drop shadow and an Outer Glow.

E57= Reduce 73.3%. Place at the feet of the poser. Take your eraser and erase the elements that are on the poser. The trick is to make it look like it’s wound around her feet. Add a drop shadow.

E49= Reduce 34.3%. Place at the bottom left corner of your canvas. Add a drop shadow.

E07= Reduce 20.2%. Place in the middle of the canvas at the bottom. Add a drop shadow.

E14= Reduce 17.9%. Place next to the shoe. Add a drop shadow.

E54= Reduce 13.2%. Place next to the grenade. Add a drop shadow.
Duplicate and place in front of the grenade or to your liking.

E69= Reduce 32.5%. Place on the left side of your canvas to your liking. Add a drop shadow.

E73= Flip horizontally. Reduce 51.4%. Place on the right side of your canvas to your liking. Add a drop shadow.

E17= Reduce 43.4%. Place in the lower right corner. Add a drop shadow.

Type the name. The color settings are 2B3521.  Size 68.47 points. After you type in your name, go to your blending options.
Check Drop Shadow using the default settings.
Check Stroke size 2, color is F9F8F8. Place the name on the bottom right of your canvas over the cap.

Add your license and your watermark.

Delete the white background. Save as .png.


I hope this tutorial was easy to follow. Again, you do not have to follow this step by step. Add your own touch to it.
January 6, 2014

CT PTU tag/tutorial I made for Jackie's Jewels

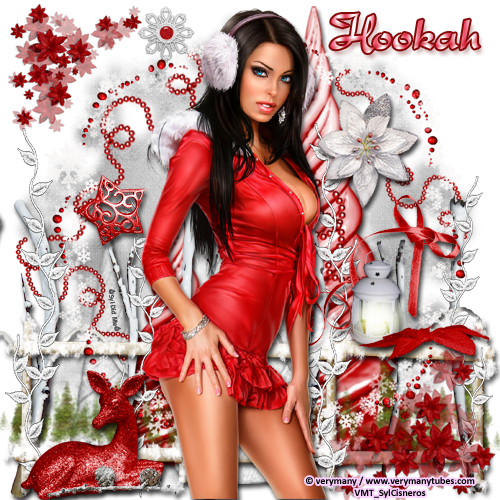
This PTU Tutorial was made with the beautiful kit Crimson Snow.


The creation of this tutorial is my own any resemblance to any other tutorial is strictly a coincidence.
Do not copy this tutorial or claim it as your own. If you would like to share it, please share the link to blog ONLY.
This tutorial was written using Adobe Photoshop CS5 and is for those with a working knowledge of Photoshop. This tutorial can be adapted for anyone with a working knowledge of PSP.

Before we start, I would like to remind you to save frequently. This is in case your program closes on you as mine is known to do. J  I save as a .psd file. This keeps your elements in layers instead of merging everything the way a .png file does. I also I do not say copy and paste your element onto your canvas. In photoshop, it is possible to drag and drop. But if you are more comfortable copying and pasting, then by all means do what is easier for you. I also use a white background while I’m making my tag but I delete it when I am finished.

Supplies needed:
Crimson Snow scrap kit from Jackie’s Jewels. You can find where to buy it here.

The tube I’m using is Verymany’s Bree. You can get it here. Remember, you cannot use any tubes without a license.

Mask: Mask 91 by Designs by Vaybs. You can get it here. Scroll halfway down the page to find it.

Font used is Cinderella. You can use any font you want though.

Photoshop Style Candy Cane. You can get it here.

Okay, let’s get started.

Open a canvas 500x500.

Create your mask using paper 7. Place in the center of your canvas or to your liking.

JJS_Trees – Reduce 84.5% Place in the center of your canvas. Add a drop shadow.

JJS_Trees Horizon = Reduce 86.1%. Place in the center of your canvas towards the bottom. Duplicate, flip horizontally and place slightly lower than the first copy.

JJS_Beads = Duplicate 3 times. Take your first copy and flip horizontally. Reduce 67.9%. Place on the left side of your canvas midway.
2nd copy = Reduce 34.8%. Rotate 48.3. Place slightly off center of your canvas or to your liking.
3rd copy = Reduce 43.1%. Rotate 43.9. Place towards the bottom left of your canvas.
4th copy = Flip Horizontally, then flip vertically. Reduce 42.9%. Rotate 53.5. Place towards the top right of your canvas, to your liking.

JJS_Woodposts = Duplicate. Place the first copy on the right side of your canvas. Add a drop shadow.
2nd copy. Flip horizontal. Place on the lower left corner of your canvas letting the element go off the page. Add a drop shadow.

JJS_Fence = Reduce 86.6%. Place at the bottom of your canvas. Add a drop shadow.

JJS_Snowflake Beads = Reduce 77.7%. Place in the center of your canvas. Duplicate.

JJS_Vine = Duplicate 3 times. First copy = Flip horizontally. Reduce 53.8%. Place on the right side of your canvas.

JJS_Floral Scatter = Duplicate. Take the first copy and flip it horizontally. Reduce 55.7%. Rotate 69.8. Place on the bottom right side of your canvas.

JJS_Vine = 2nd copy. Reduce 64.8% Place on the left side of your canvas. Add a drop shadow.

JJS_Vine = 3rd copy. Reduce 64.3%. Place over the red tree. Add a drop shadow.
4th copy = Reduce 53.8%. Place near the little red tree or to your liking. Add a drop shadow.

Take your second copy of Element JJS_Floral Scatter. Reduce 44.3%. Rotate 18.4. Place at the top left of your canvas.

JJS_Flower1 = Reduce 39.9%. Place on the right side of your canvas. Add a drop shadow.

JJS_Deer = Reduce 35.5%. Place on the bottom left of your canvas. Add a drop shadow.

JJS_PinconeBranch = Flip horizontally. Reduce 32.9%. Place in front of the deer to your liking. Add a drop shadow.

JJS_StarDeco = Reduce 23.7%. Rotate –13.0. Place on the left side of the little red tree. Add a drop shadow.

JJS_Ribbon1 = Reduce 35.4%. Place on the right side of your canvas. Add a drop shadow.

JJS_SnowflakeDeco = Reduce 18.2%. Place at the top left, near JJS_FlowerScatter. Add a drop shadow.

JJS_Lantern = Reduce 39.2%. Place on the fence on the right side to your liking. Add a drop shadow.

JJS_Flower2 = Reduce 35.5%. Place near the lantern to your liking. Add a drop shadow.

Open your tube. Reduce and place on your canvas to your liking. Add a drop shadow.

Type the name. I just typed it in Black. Size 48 points. After you type in your name, go to your Styles in your layer box. Click on Candy Cane.
To bring the name out more, I added a stroke to it. Open your Blending Options.
Check Stroke size 2 Color is 850808. Place the name on the top right of your canvas.

Add your license and your watermark. Delete the white background if you used one and you are done.


I hope this tutorial was easy to follow. Again, you do not have to follow this step by step. Add your own touch to it.

January 1, 2014

CT Tag New Year for Scrappin' Krazy Designs

Here is my first animated tutorial. I used the awesome scrap kit called New Years from Scrappin' Krazy Designs. I hope you find it easy to follow.


The creation of this tutorial is my own any resemblance to any other tutorial is strictly a coincidence.
Do not copy this tutorial or claim it as your own. If you would like to share it, please share the link to blog ONLY.
This tutorial was written using Adobe Photoshop CS5 and is for those with a working knowledge of Photoshop. This tutorial can be adapted for anyone with a working knowledge of PSP.

Before we start, I would like to remind you to save frequently. This is in case your program closes on you as mine is known to do. J  I save as a .psd file. This keeps your elements in layers instead of merging everything the way a .png file does. I also I do not say copy and paste your element onto your canvas. In photoshop, it is possible to drag and drop. But if you are more comfortable copying and pasting, then by all means do what is easier for you. I also use a white background while I’m making my tag but I delete it when I am finished.

Supplies needed:
Scrappin’ Krazy Designs, New Years scrap kit. You can find where to buy it here.

The tube I’m using is Digital Doll from Ismael Rac. You can get it here. Remember, you cannot use any tubes without a license.

Mask: Myth Mask 60 by Mythical you can find it here.

Font used is Fabius. You can use any font you want though.

Open a canvas 500x500

Create your mask using paper 12. Place on your canvas to your liking.

E53= Maximize to 118%. Place in the center of your canvas.

E36 = Reduce 68.0%. Place on the top left of your canvas. Add a drop shadow.

E39 = Place near the top right corner of your canvas.

E43 = Reduce 60.3%. Place towards the right side of your canvas.
Duplicate 3 times. Take your first copy and rotate 25.3.
Take your second copy and rotate 84.7.
Take your last copy and rotate 126.3
These 4 elements are what you’re going to use for your animation.

E39 = Place near the left top of your canvas. Over the clock.

E09 = Reduce 39.1%. Place near the top right of your canvas or to your liking.

E10 = Reduce 64.2%. Rotate 17.7. Place in the center towards the right side of your canvas. Add a drop shadow.

E38 = Flip and place on the right side of your canvas.

E60 = Maximize to 107.9%. Place in the center of your canvas. Add a drop shadow.

E57 = Reduce 58.2%. Place in the lower right hand of your canvas. Add a drop shadow.

E38 = Place on the left side of your canvas over the clock.

Open your tube. Resize to your liking. Place slightly towards the left side of your canvas. Add a drop shadow.

E40 = Resize to 43.9%. I have it looking like it is in my tubes hand. Duplicate and place the dupe under the tube layer.

E24 = Resize to 43.0%. Place in the lower left corner of your canvas. Add a drop shadow.

E44 = Reduce 26.4%. Rotate –26.8. Place over the disco ball. Add a drop shadow.

Type the name. The color settings are E12684.  Size 72 points. After you type in your name, go to your blending options.
Check Drop Shadow changing the Distance to 3. The rest of the settings stay the same.
Check Bevel and Emboss using the default settings.
Check Stroke size 3 Color is 84087B1. Place the name on the top right of your canvas or to your liking.

Now for the animation: Before we start, make sure you keep your white background checked. Do not delete it. If you want to delete the white background, that’s up to you but animated sigs look better with the white background on them.

If you have a hard time seeing the example pics, just click on them, that will enlarge it.

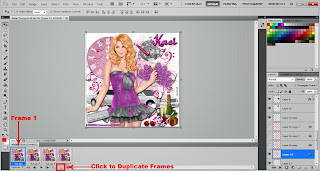
Now, activate your animation window. Duplicate your frame 3 times.


After you do this, make sure Frame 1 is active.
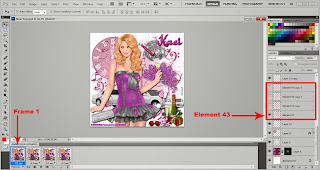
In your layer window, make sure the original layer Element 43 is active. Uncheck the ‘eye’ of the original layer Element 43 copy, Element 43 copy 2 and Element copy 3 as shown below.


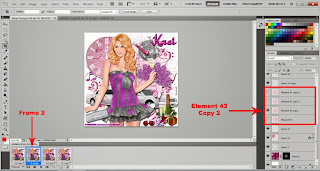
Now make sure Frame 2 is active. In your layer window, make sure Element 43 copy is active. Uncheck the ‘eye’ of the original layer Element 43, Element 43 copy 2 and Element copy 3 as shown below.


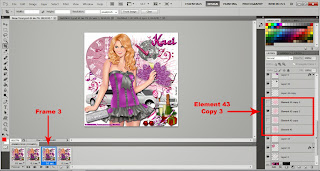
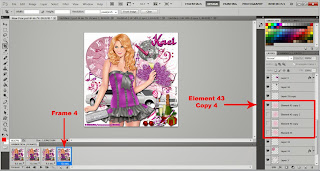
Now make sure Frame 3 is active. In your layer window, make sure Element 43 copy 2 is active. Uncheck the ‘eye’ of the original layer Element 43, Element 43 copy and Element copy 3 as shown below.


Now make sure Frame 4 is active. In your layer window, make sure Element 43 copy 3 is active. Uncheck the ‘eye’ of the original layer Element 43, Element copy and Element copy 2 as shown below.


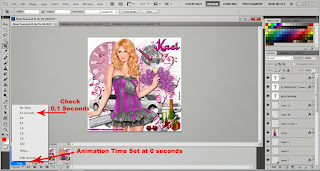
Last step: In your Animation Frames window, where you see the word Forever. Right above that, where the arrow is it will say 0 secs. Click on the little arrow then click on 0.1 seconds.


Do this for all 4 frames. It will look like this:


Click the play button. If you’re satisfied with the results, go to File>Save for Web & Design. A window will open up. Click Save. Another window will open that says Save Optimized As. Click Save.

Add your license and your watermark.

I hope this tutorial was easy to follow. Again, you do not have to follow this step by step. Add your own touch to it.